Tunic

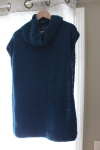
This is by far my “biggest” project I have done. It hasn’t taken the longest but it is the largest. It was almost like making a small afghan :0) I ordered this yarn a year ago & for Christmas last year (2012) Mom Funk gifted it to me. My plan was to make a coat out of it but that just seemed daunting & I thought I probably wouldn’t wear it too much. Then I thought maybe I would make a skirt, dress, tunic (normal one)…But I just couldn’t find anything that seemed youthful enough & pretty brainless…Then I stumbled upon a sample catalog for Bergere De France & found this tunic and fell in love! I ordered the catalog (From France! So you know its gotta be trendy, right?!? :0)) And when I opened it up and read the pattern I realized that the yarn would work perfectly! I didn’t have to change the pattern at all, which is a great blessing!

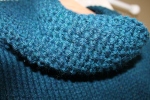
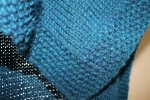
The pattern was easy peasy and great to do while watching tv as it is stockinette besides the borders which are moss/seed stitch. It did get a little boring as the front and the back are near identical and each side measures 27 inches! Anyways, here are the details & some photos!

Pattern: Tunic
Book: Bergere De France
Size: One size fits most – this would be VERY easy to adjust
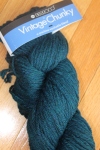
Yarn: Berroco Vintage Chunky color:6185
Needle: 10.5

Entwined Cowl

Well I promised my next blog would be about the Entwined Cowl (sorry it took so long, I have been a little un-motivated when it comes to blogging). I first saw this at Market in Columbus, OH. I thought it was so cute & thought “Oh, well that won’t be too hard”. It went fast as in it only took a few days to make & assemble BUT it was a slow process. You knit 8 long but narrow pieces until they are about 3 ft long, so by the end it was a little mind numbing & I pushed through so I wouldn’t have to look at it again! :0)

Once I was done I had to block it & assemble it. I thought this would take me about 1 hour…It took 4! AHH…have you ever “braided” 8 pieces before? It is a bit tricky. Non-the-less here are the details!

Entwined Cowl
Pattern by ~ Tanis Gray
Yarn ~ 3 skeins Satisfaction by Simply Sweet (2 Pine & 1 Winter White)
1 skein Whipped Cream by Simply Sweet (Moss)

Next Blog: Either update or Neckerchief (it is to die for!!)

Baby Alpaca Infinity Scarf

So turns out I have been able to get A LOT of knitting done! I am thinking I am getting about 1 project done every 3 or so days. My last finished project was this scarf. I had purchased the yarn last fall & had planned to make it for winter, well I got busy making things for other people & just never did. I finally started it again this spring & I hated the pattern I was doing, so a few weeks ago I ripped it all out!

I decided to do a rib pattern instead & loved the outcome! I cannot wait to either wear it myself this fall/winter or give to my hubby or one of my lovely brother-in-laws (I think they would appreciate more than the hubby :0))

It is made with 100% Baby Alpaca which is a more expensive luxurious yarn. I think most people have a love/hate relationship with it. Why? Love – Because it is the softest yarn EVER & Hate – It sheds to say the least!

Details:
Yarn – 100% Baby Alpaca
3 Skeins (I lost the tag & can’t remember how many yards it was total…I am guessing in the 300’s)
Needle Size – 13 & on a 29 in. cord

Pattern: (I made it up myself)
Cast on approx 200 stitches, I think I had either 200 or 215, it didn’t really matter so I didn’t count again.
Join in the Round being careful not to twist, although if you get far enough in and it is twisted it will just offer a different look, not bad.
Purl 4 rows & Knit 4 rows until desired width.
**The edges will curl up slightly but that’s okay because it is still plenty big and poofy…

Enjoy the pictures!!

Gia’s Rainbow Coat

A few months ago Nana (Debi) knit Oliver a rainbow coat that he had requested. At that time Gia was bitten by the jealous bug every time there was a “fitting” it was clear she wanted her own. So I decided that I would make her a coat :0)

There was a Trunk Show by Dye-namic Duo (Hand painted Fiber & Yarns) at Knit 4 Yarn Shop and they had the prettiest little girl color scheme yarn, I knew I had to make her a coat out of it! They had a sample knit up (in a different color) & it was darling. So I began the journey in May & finished earlier this week. This was made with small needles & more detailing than normal for me. The end product was everything I hoped!

Heres the info.

Yarn: 2 skeins Dye-namic Duo (434 yds each I used 1 and then a little of the 2nd)
3 Ply Fingering Weight
60% Superwash Merino, 30% Bamboo, 10% Nylon
Color: Pinata
Pattern: Sublime #640 The Little Vintage Smock
Size: 2-3

I did alter the pattern a smidge I made so the buttons continued down the whole coat instead of the “smock” look of just 3 at the top, just personally not my style.

I should note that while I love the end product of the coat it was hard for me to make. I tend to dress Gia in clothes that I like or things that I would wear. Sometimes I have to sit back and remember that she is a little girl and it’s okay to dress them like a little girl not a little adult. So that is why the colors are little girl like & the buttons are cute little hearts. That is just me sharing a little of a conviction as of late that my little girl doesn’t have to be trendy she just has to be a little girl!!

Enjoy the pictures!!!

Sequim Shawl

So I am going to start tracking my Funky Designs projects on my blog, this will give you an idea of what I make, what I can make & it will just be a good source to have where I keep pictures of all finished projects.

When I saw this Knit up in the pattern book I immediately fell in love! I loved everything about it! One great thing is, it is knit using size 11 needles!! Which means to all of you non-knitters that they are big & so is the yarn which = fast project. I have been working on a coat for Gia that uses size 2 & 6 needles so I was thrilled to start a fast project that was for me :0) So I took a break on her coat & started my Shawl & 2 wks later I was finished! (I went back & forth working on her coat & working on the shawl)

Details:
Yarn: Berroco Karma (6 skeins/balls)
Color: 3424 – Teal
Pattern book: #330
Wooden beads for detail

Menu Planning

I have gotten several inquiries on how I go about menu planning so here goes me trying to explain how I do this. This is what works for us so perhaps this isn’t the method for you but maybe it will motivate you?? The reason I do this is because 1. It saves money 2. We eat what we have (aren’t as wasteful) 3. Lots less stress having it all done a month ahead or days/weeks

First I go to http://moneysavingmom.com/downloads/meal-menu-planners
I download #10 which is a 4 week horizontal guide, that is just my preference here is a close up of what that looks like for everyday.

Close up

I usually print off 4 or 5 copies at once & just keep them in the back of my calendar/schedule book so that each month I can just pull one out without having to print it out each month.

Now that I have that printed off I begin to jot down meal ideas. I try to think of chicken, beef, hamburger, pork, pasta & breakfast ideas to keep the menu from being all chicken one week. Which before I started planning like this we would sometimes just have all chicken or all beef. So this helps keep everything “new”.

Then I set a day (but not officially) that I do ground beef, chicken, pasta, pork & etc. I also do this for breakfast & lunch so that we get some variation throughout the week instead of everyday at 11:30 I am not pulling out the PB & J or cheese crisp/quesadilla.

For breakfasts I do: Granola Bars, yogurt, cereal (2x), oatmeal, pancakes, something fun for Saturdays like: orange rolls, oven pancakes, french toast & then Sun. we normally always just do cereal

For lunch I do: Soft Pretzel & cheese, hot dogs, pb & j, left-overs, cheese/meat/crackers, cheese crisp & then on Saturday’s we normally do frozen pizza

Here is what it looks like once I complete the chart. This used to take me a few hours to come up with all the ideas and then sort it out but I have saved my past menu’s and so when I am in a crunch I just look at that and repeat ideas. Sometimes I ask Dusty for his imput but it normally isn’t anything I haven’t already come up with.

Completed

Lastly what I do to stick to my plan is I write it on my chalk board. This is just the side of my cabinet/pantry in my kitchen that we painted with chalk board paint. I love it because everyone (who can read :0)) knows what is going on. This also keeps me to my schedule instead of randomly eating out. So here is a photo of that.

001

If you have any questions feel free to ask!

Sugar Scrub

I first got this as a gift about a month ago & that very night I tried it & fell in LOVE! I am normally not big on “scrubs” but this one was so light & fresh. With my Sister-in-Laws Birthday coming up I knew this was the perfect gift! I knew/hoped she would love it & she did!

So here is what you need: Jar of sorts, a few cups of sugar & about a 1/4 a bottle of the Dawn Olay Hand Renewal (you can get about 4 out of one bottle!!!)
Supplies

Pour in the Sugar!

Fill the jar about 3/4 full of sugar

Fill the jar about 3/4 full of sugar

Pour in the Soap

Then pour in the soap until you get the consistency you like.

Then pour in the soap until you get the consistency you like.

Mix with a spoon is easier than by hand…Add more sugar or more soap depending on the texture you like.

I just used a spoon to stir it and then would try some to see if I liked the consistency.

I just used a spoon to stir it and then would try some to see if I liked the consistency.

Add a pretty little something:label, ribbon, sticker etc.

Add a cute little label and it is ready to go!

Add a cute little label and it is ready to go!

This makes the perfect little gift! As you can see it really doesn’t get much cheaper & easier to make a useful & thoughtful gift. I hope you try it out for yourself because it is wonderful!

Thanks Joanna blessing me with the gift in the first place!!

Gia’s Big Girl Room

So her big girl room is all done! YAY! She has been doing great in her bed! At this point she still waits for us to come and get her in the morning & after her nap.

My inspiration for the bedroom came from the curtains. I had made them for her before she was born & just thought they were kind of “whimsical” I loved that they were girly but not cheesy. So I painted her room a pinkish/peachy color & I love it! It is so fresh!

My next idea was that I wanted it “soft” and slightly rustic to go against the pink. So we added my old college bed (Love the wood frame) and the mirror & “coat rack”.

After that I decided to just pull some of the colors that were in the curtain out and onto the bed which is why it is that yellowish/green color, same with the blue pillow.

Anyways, hope you like it, I had fun doing it but I am SO glad it is done!!!