Living Well Spending Less

Living Well Spending Less….It’s a nice idea isn’t it? While we can all say we live “well” are we willing to cut back to save money, give money & budget money? A friend of mine said she was going to do this challenge for the month of October. Back in August we decided to be more aggressive with paying off our home & student loans. I got a job…YES a job! I can talk about that later though 🙂 While we still had our regular budget for hobbies, food, eating out, clothing, home improvements & etc. I/We would consistently not follow it. So with anything additional I started to pay for that with “my” money. If I had already exhausted the food budget for the week & we wanted to eat out I would pay cash with the money I had earned vs. charging it to the credit card. This helped me be WAY more aware of what we were spending & did I really want to eat out bad enough to spend “my own” money? Anyways this helped us a great deal! We were able to save a lot of money by not spending money on a whim & paying extra on loans.

So, initially I thought do I really need to do this challenge? I have already cut back SOO much! But in the end I was spending that money I was earning, I wasn’t really saving it. I was using it to “treat” the family. Which I LOVED being able to do!!! However with more expenses with Birthday’s, Holiday’s and a wedding I thought in order to keep paying aggressively on these loans I need to save more.

I went through my pantry, refrigerator & freezer and took inventory! I am planning my meals based on what I have. For example I have quite a bit of cereal on hand but I also have a lot of oatmeal on hand. So we are going to start having more oatmeal & eggs for breakfast instead of cereal. I am excited to see space cleared out in not only my pantry but freezer also!!

I have budgeted things for parties, showers, birthday gifts & etc. And I am excited to save money! I love the idea of a challenge – go figure 🙂 I have also set rules for things I cannot buy – Clothing, Decor & Eating Out are my big ones! Because all of that was adding up quickly!!!

So if you notice me being a little cheap or saying hmm better not that is why. I will keep you posted on how I am doing either throughout the month or at the end!

Sausage-stuffed Zucchini Boats

Back in January I completed in a weight loss challenge (to get rid of the baby weight) | lose 6% in 6wks, I went on to meet my goal (minus some!) a few months later and with that I became intentional about the food we ate and tried to be very health conscious. I replaced pork sausage with turkey sausage because seriously have you ever seen how many calories are in sausage?!?! His favorite thing is sausage so you can imagine the happiness when I started using turkey, because although it’s not bad, you CAN tell a difference! I was met with some resistance from my carb-loving-hubby! It wasn’t uncommon to see him look at his plate of food and then at the menu board, over & over…or once he looked at his plate and said “where is the carb?!?!”

That being said we have reached the age of compromise where I still like to eat healthy but am cooking things that I know will be appreciate. So with our eating intentionally comes zucchini boats, with all fresh seasonal items minus the cheese and real sausage not turkey for the hubs.

I should note this is kid friendly | kids ate this well although the idea of ice cream cones (a rarity in our house) may have helped ensure they ate it ALL. 🙂

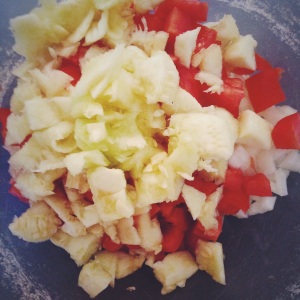
Chopped | garlic, opinion, tomato & zucchini

Chopped | garlic, onion, tomato & zucchini

Sausage + veggies

Sausage + veggies

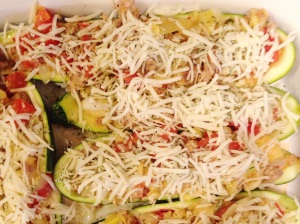
Pile with sautéed sausage + veggies and top with cheese

Pile with sautéed sausage + veggies and top with cheese

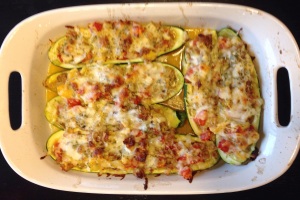
Finished product

Finished product

Sausage Stuffed Zucchini Boats

1lb sausage

1 onion | chopped

2 vine ripe tomatoes | chopped (use a serrated knife it’s great!)

3 zucchini | washed & halved lengthwise

2 garlic cloves | chopped

1/2 C grated Parmesan

1/2 C grated mozzarella

dash dried parsley (because I didn’t have fresh)

salt + pepper to taste

Directions

Preheat oven to 400

while browning the sausage, cut zucchini in half and scoop out inside and roughly chop. Cut tomatoes, onion and garlic. When sausage is done add the veggies and sauté for approx 5min. add salt + pepper.

place the emptied zucchini boats in a 9×13

pile sausage + veggie mixture in boats until used up. Top with cheese and some dried parsley.

cook for 20 min.

\\\\recipe adapted from Food Network – Nancy Fuller | sausage stuffed zucchini boats////

enjoy!

Eating with purpose

I waste SO MUCH FOOD! Do you? After throwing out produce and sour cream, ricotta cheese and etc. I realized I am not intentional about what we eat. I mean I TRIED to be but was failing. This summer I decided to be intentional with what we eat | breakfast, lunch & dinner.

I now go to the Farmers Mkt on Monday mornings and buy local, fresh, in season produce. This is helping me so much! The food seems more meaningful when buying from someone local even though they get the money whether I eat it or how it away, it would just seem shameful to let it waste. That being said I am working hard on being intentional with our menu planning and being flexible if there is food that will soon go bad that I may have forgotten about.

Menu this week:
Sunday | Mac n’ cheese (dusty was gone)
Monday | Steak kabobs + skewers of squash, zucchini & onion
Tuesday | BLT’s + fresh fruit
Wednesday | Zucchini Boats + fresh fruit & bread from the freezer
Thursday | Breakfast for dinner
Friday & Saturday | dusty and I will be in Chicago 😀

My “theme” was zucchini, squash & tomatoes based on what was available at the farmers mkt. I try to integrate different types of protein and different styles which keeps it interesting for me. I also try to keep it healthy for everyone! Planning my meals helps me stay disciplined because honestly I LOVE to eat out!

Anyways that’s what’s on my mind today. Stay tuned for my Zucchini Boats recipe + post.

We went to the ZOO yesterday with A. Mary and Nola so here’s a photo. We had a blast!!
image

Menu Planning

I have gotten several inquiries on how I go about menu planning so here goes me trying to explain how I do this. This is what works for us so perhaps this isn’t the method for you but maybe it will motivate you?? The reason I do this is because 1. It saves money 2. We eat what we have (aren’t as wasteful) 3. Lots less stress having it all done a month ahead or days/weeks

First I go to http://moneysavingmom.com/downloads/meal-menu-planners
I download #10 which is a 4 week horizontal guide, that is just my preference here is a close up of what that looks like for everyday.

Close up

I usually print off 4 or 5 copies at once & just keep them in the back of my calendar/schedule book so that each month I can just pull one out without having to print it out each month.

Now that I have that printed off I begin to jot down meal ideas. I try to think of chicken, beef, hamburger, pork, pasta & breakfast ideas to keep the menu from being all chicken one week. Which before I started planning like this we would sometimes just have all chicken or all beef. So this helps keep everything “new”.

Then I set a day (but not officially) that I do ground beef, chicken, pasta, pork & etc. I also do this for breakfast & lunch so that we get some variation throughout the week instead of everyday at 11:30 I am not pulling out the PB & J or cheese crisp/quesadilla.

For breakfasts I do: Granola Bars, yogurt, cereal (2x), oatmeal, pancakes, something fun for Saturdays like: orange rolls, oven pancakes, french toast & then Sun. we normally always just do cereal

For lunch I do: Soft Pretzel & cheese, hot dogs, pb & j, left-overs, cheese/meat/crackers, cheese crisp & then on Saturday’s we normally do frozen pizza

Here is what it looks like once I complete the chart. This used to take me a few hours to come up with all the ideas and then sort it out but I have saved my past menu’s and so when I am in a crunch I just look at that and repeat ideas. Sometimes I ask Dusty for his imput but it normally isn’t anything I haven’t already come up with.

Completed

Lastly what I do to stick to my plan is I write it on my chalk board. This is just the side of my cabinet/pantry in my kitchen that we painted with chalk board paint. I love it because everyone (who can read :0)) knows what is going on. This also keeps me to my schedule instead of randomly eating out. So here is a photo of that.

001

If you have any questions feel free to ask!

Strawberry Shortcake

So here is my Strawberry Shortcake post. I love this recipe so much! It is sooo delicious! It is dense & moist & sweet but not too sweet. It is easy to make & looks great!

A few notes: I would make this only the day of especially if it is for a potluck of sorts. I have found that it is best that very night still warm & after that it just really isn’t the same. So with that in mind if there are only 2 of you I would suggest making half a recipe.

Recipe to follow photos

Shortcake - I like the "plopped down" look

Shortcake – I like the “plopped down” look

It makes 4 very generous shortcakes, you could easily get by with 6 & maybe 8 if you had a really big meal before hand.

It makes 4 very generous shortcakes, you could easily get by with 6 & maybe 8 if you had a really big meal before hand.

I don't use a food processor because I don't have one so I use my Kitchen Aid

I don’t use a food processor because I don’t have one so I use my Kitchen Aid

Marinating in Sugar

Marinating in Sugar

I think a cold Diet Pepsi as a beverage with it is the perfect pairing!

I think a cold Diet Pepsi as a beverage with it is the perfect pairing!

Yumm...Finished product

Yumm…Finished product

One for me one for my helper

One for me one for my helper

My beloved...He requests this shortcake recipe always...he says "let's have strawberry shortcake, but not the gross kind, the good kind that's your recipe" :0)

My beloved…He requests this shortcake recipe always…he says “let’s have strawberry shortcake, but not the gross kind, the good kind that’s your recipe” :0)

Individual Strawberry Shortcakes
1 quart Strawberries, hulled & quartered
1/4 Cup Sugar, plus 3 T, plus 4 teaspoons
2 Cups All-Purpose Flour
1 T Baking Powder
1/2 t Salt
8 T Butter, cold & cubed
2/3 Cup Half & Half, plus 1/4 C
Sweetened Whipped Cream
Fresh mint sprigs, for garnish

Preheat oven to 400 degrees.

In medium bowl, toss strawberries & 1/4 C sugar together and let set.

In mixer, mix flour, baking powder, salt & 3 T sugar. Then mix in cold butter cubes until a coarse meal is formed. Turn flour mixture into a large mixing bowl and make a well in the center. Pour 2/3 C half & half and gently mix it in with a rubber spatula or fork, be careful not to over mix the dough or biscuits will be tough.

“Plop” biscuits down on to a parchment paper lined baking sheet. Brush the tops of each biscuit with the remaining half & half & sprinkle each with 1 t Sugar. Bake in a preheated oven for 12-15 min. or until the biscuits have risen and are a light golden brown.

Remove from oven & let cool SLIGHTLY. Top with strawberries & whipped cream. Garnish with fresh mint & more strawberries.

Recipe adapted from: Paula Deen :0)

Strawberry Freezer Jam

I prefer freezer jam to canned jam. One reason is I think the flavor & texture is better & the second reason is when canning you cook the jam & that causes the jam to lose its bright red color which I love. So if you are debating between canning & freezer that is my two-cents. Plus freezing is WAY faster & EASIER!

The recipe will be at the bottom under the pictures :0)

Strawberry Freezer Jam - Looking cute and ready to be eaten!

Strawberry Freezer Jam – Looking cute and ready to be eaten!

These were such a pain to find!!!  I was looking for the cute canning labels & checked Menards & Kroger, neither had them!  I finally went to Office Depot & just bought these ones - I think they look great now :0)

These were such a pain to find!!! I was looking for the cute canning labels & checked Menards & Kroger, neither had them! I finally went to Office Depot & just bought these ones – I think they look great now :0)

I got 19 containers from about 4 1/2 lbs.

I got 19 containers from about 4 1/2 lbs.

I love the consistency of this freezer jam!  When I have made it in the past it was always SUPER runny, and this jam is not!  It is nice & thick and doesn't slide all over the place...mmmm (and that is homemade bread!)

I love the consistency of this freezer jam! When I have made it in the past it was always SUPER runny, and this jam is not! It is nice & thick and doesn’t slide all over the place…mmmm (and that is homemade bread!)

Strawberry Freezer Jam
2 C pureed Strawberries (I used the mix setting on my blender to ensure it wouldn’t be to runny)
4 C Sugar
1 box fruit pectin (I used generic Kroger brand & it worked fantastic!)
3/4 C Water

Mix strawberries & sugar well. Set aside 10 min. Place fruit pectin & water in saucepan. Bring to a boil, stirring constantly. Boil 1 min. Remove from heat. Stir mixtures together until sugar is dissolved and no longer grainy. Pour into plastic containers; cover. Let stand at room temperature 24 hours. Store in refrigerator or freezer. Yields about 4 cups.

Source: Renee’s Recipe Collection

notes
Mine made about 5 or 6 containers per batch. I made 3 batches all seperate. I also used some glass containers, I ran out of plastic & I have done it before & it is fine. I actually prefer the look too!

Enjoy!!